Deploying Payload CMS on AWS Amplify: RDS, Google SSO, IAM Roles
Most content sites don't need an always-on server. A marketing site or blog spends the majority of its life idle, so paying for a 24/7 VPS or container is largely paying for nothing. Serverless flips that: you pay per request and per second of compute, and an idle site costs almost nothing.
This post walks through how I deployed Payload CMS with a Next.js frontend on AWS Amplify for a production marketing site — and, importantly, how it differs from the tutorials you'll find elsewhere:
- No S3 access keys. Media storage uses an IAM role attached to the Amplify compute, resolved through the default AWS credential chain. No long-lived secrets.
- Amazon RDS (Postgres) instead of a hosted Mongo cluster.
- Google SSO for the admin panel, with an email allowlist as the access control.
- Time-based ISR for content freshness — and a section on why the "instant on-demand revalidation" pattern isn't the right fit here: on-demand ISR is a known, AWS-documented limitation of Amplify Hosting.
- Direct-to-S3 image uploads via presigned URLs, keeping large files off the compute path entirely.
- A CI/CD pipeline: ESLint, Vitest, Semgrep (SAST), Trivy (SCA), and pre-commit hooks.
- Slack alerts for builds and runtime errors.
- Everything provisioned in the AWS Console (no IaC required to follow along).
If you have sustained high traffic or need instant, cluster-wide cache invalidation, read the caching section carefully — Amplify has a real limitation there, and I'll tell you exactly what it is and how I measured it.
Architecture Overview
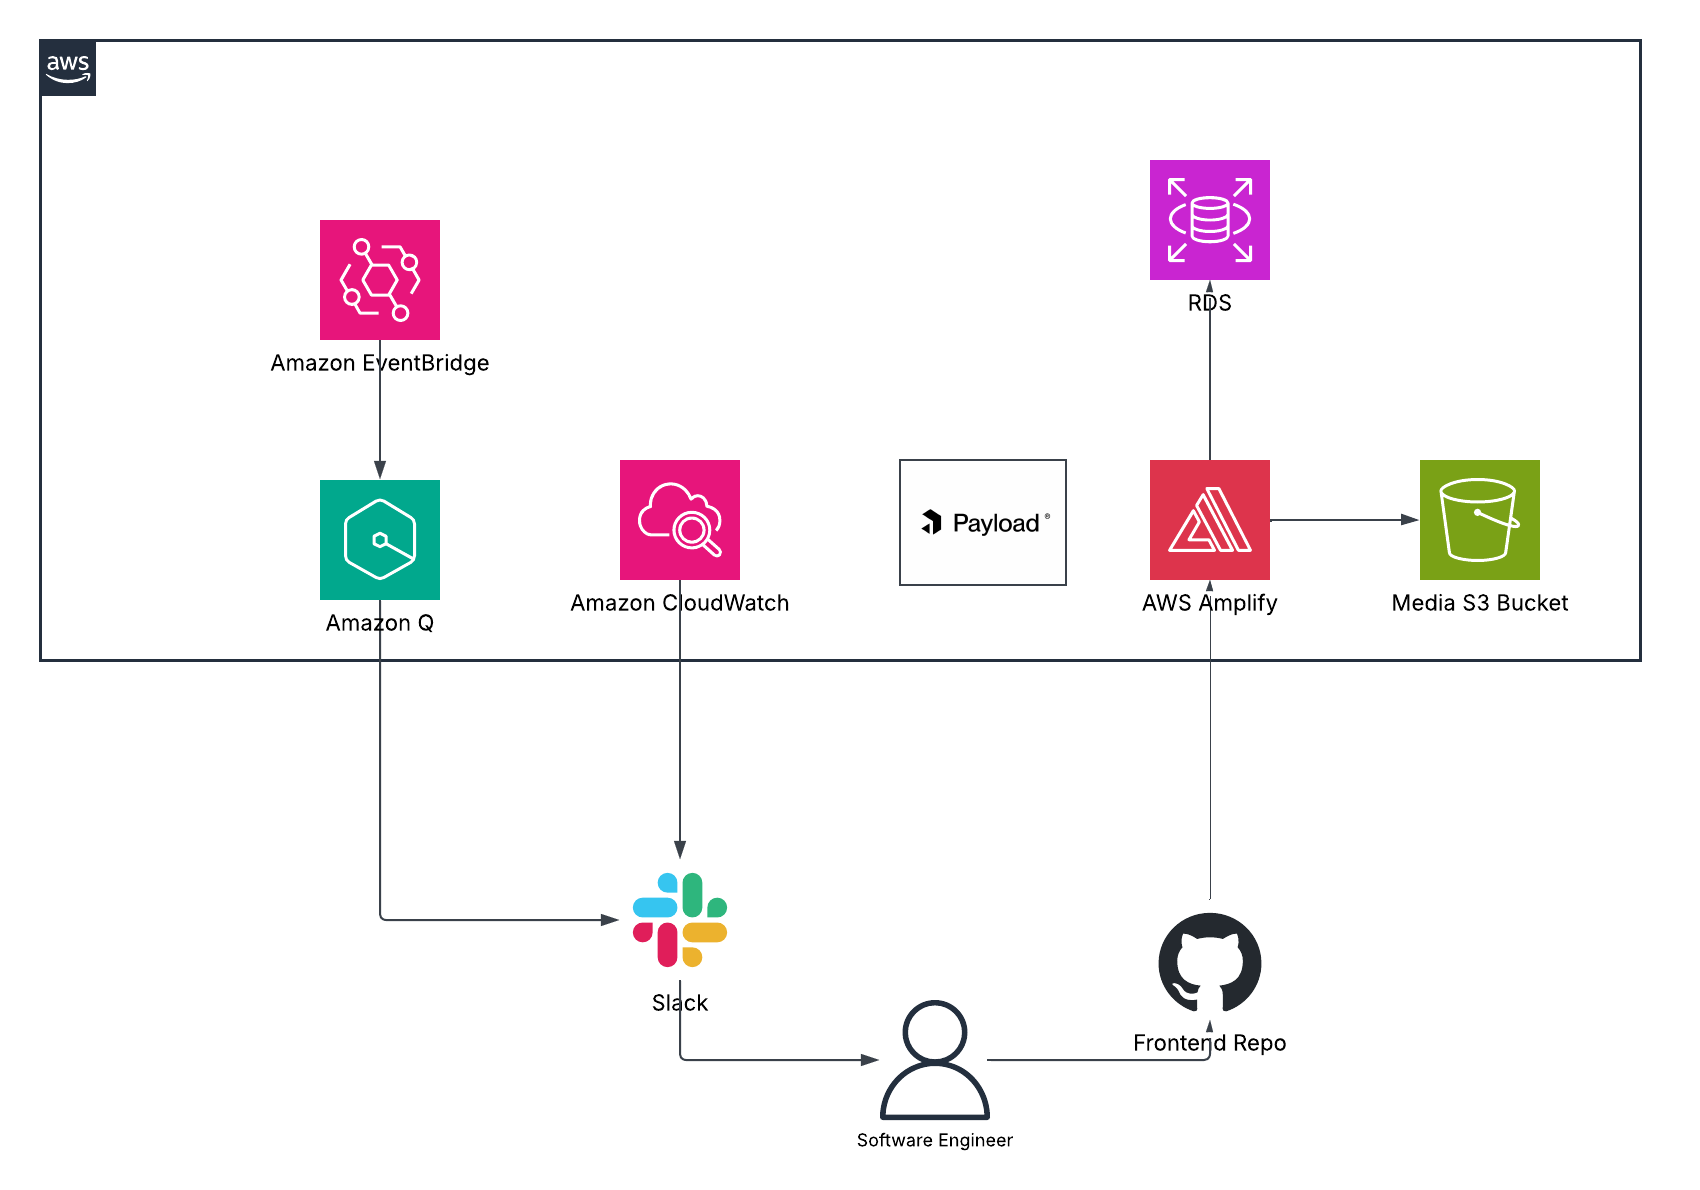
The pieces:
| Layer | Service | Notes |
|---|---|---|
| Hosting / SSR | AWS Amplify Hosting (compute) | Runs Next.js SSR on managed Lambda, fronted by CloudFront |
| App + CMS | Next.js + Payload CMS | Payload runs inside the same Next.js app (admin at /admin, API under /api) |
| Database | Amazon RDS for PostgreSQL | TLS enforced; reached from the compute layer |
| Media | Amazon S3 | Uploaded directly from the browser via presigned URLs; served from S3 |
| Auth | Google OAuth + Auth.js | Admin sign-in, gated by an email allowlist |
| Edge security | AWS WAF | Web ACL with AWS managed rule groups (default rules, no custom tuning) |
| CI/CD | GitHub Actions + pre-commit | Lint, tests, SAST (Semgrep), SCA (Trivy) |
| Alerting | EventBridge + CloudWatch → SNS → AWS Chatbot → Slack | Build status (EventBridge rule + input transformer) and runtime health alerts |
A key property: because Payload is embedded in the Next.js app, there's no separate CMS server to run. The admin UI, the content API, and the public site are one deployable unit.
Project structure — Payload inside Next.js
The whole thing lives in one Next.js App Router tree. The trick that makes it work is route groups and catch-all dynamic routes:
src/
  app/
    (frontend)/                      # route group: public site (parens = no URL segment)
      layout.tsx                     #   public layout (nav/footer)
      page.tsx                       #   home
      [lang]/                        #   locale segment → /en/..., /ar/...
        about/page.tsx
        solutions/.../page.tsx
      blogs/
        page.tsx                     #   /blogs (listing)
        [slug]/page.tsx              #   /blogs/:slug (detail) — ISR
      case-studies/[slug]/page.tsx   #   /case-studies/:slug
      events/[slug]/page.tsx         #   /events/:slug
      api/                           #   frontend API (form submits, etc.)
    (payload)/                       # route group: Payload admin + API (generated)
      layout.tsx                     #   Payload's own root layout
      admin/[[...segments]]/page.tsx #   optional catch-all → the whole admin at /admin/**
      admin/importMap.js             #   generated by `payload generate:importmap`
      api/[...slug]/route.ts         #   catch-all → Payload REST API at /api/**
      api/graphql/route.ts
    api/
      auth/[...nextauth]/route.ts    #   Auth.js routes (incl. /api/auth/callback/google)
  collections/                       # Posts, Media, Users, Categories, ...
  payload.config.ts
  auth.config.ts
Why the (…) and […] folders matter
(frontend)/(payload)— route groups. Parentheses group routes without adding a URL segment. This is the core Payload-in-Next.js pattern: the public site and the admin get separate root layouts in the same app./adminrenders Payload's layout; everything else renders your marketing layout.admin/[[...segments]]— optional catch-all. The double brackets match/adminand everything beneath it (/admin,/admin/collections/posts, …). Payload's admin is effectively an SPA served through this one route.api/[...slug]— catch-all. A single route handler backs Payload's entire REST API under/api/**(create/read/update/delete for every collection). GraphQL sits beside it.api/auth/[...nextauth]— catch-all. Auth.js mounts all its endpoints here, including the/api/auth/callback/googleredirect URI you register in Google.[slug]— single dynamic segment. The public content detail pages. Pair each withgenerateStaticParams()(prebuild known slugs) andexport const revalidate(ISR) — this is where the caching section applies.[lang]— locale segment. Drives/enand/ar; middleware handles the default-locale redirect.
The (payload) group is scaffolded by create-payload-app and refreshed by payload generate:importmap — you rarely hand-edit it. You spend your time in (frontend), collections/, and payload.config.ts.
Prerequisites
- An AWS account.
- A GitHub repository with a Next.js + Payload CMS app.
- A Google Cloud project (for OAuth credentials).
- Node.js 20+ locally.
Step 1 — Amazon RDS for PostgreSQL
A db.t4g.micro is plenty for a small site (Free Tier eligible for the first 12 months). Create it with the CLI:
# Create the instance. It's publicly reachable because Amplify's managed compute runs outside your VPC.

aws rds create-db-instance \
  --db-instance-identifier ds-payload-db \
  --engine postgres --engine-version 16 \
  --db-instance-class db.t4g.micro \
  --allocated-storage 20 --storage-type gp3 \
  --master-username payload --master-user-password '<STRONG_PASSWORD>' \
  --db-name appdb \
  --vpc-security-group-ids sg-xxxxxxxx \
  --backup-retention-period 7 \
  --publicly-accessible \
  --region eu-west-1

# Once status is "available", grab the endpoint for the connection string.

aws rds describe-db-instances --db-instance-identifier ds-payload-db \
  --query 'DBInstances[0].Endpoint.Address' --output text --region eu-west-1
Notes that matter:
- Same region as your Amplify app and S3 bucket to avoid cross-region latency and transfer charges (I used
eu-west-1). - Why publicly accessible? Amplify Hosting compute isn't in your VPC, so it reaches RDS over the public endpoint. Harden it with a tight security group + enforced TLS; for stronger isolation use RDS Proxy or move the compute into a VPC.
TLS is enforced. RDS runs with rds.force_ssl=1, so the app must connect over SSL. In Payload's Postgres adapter I gate this on an env var:
db: postgresAdapter({
  pool: {
    connectionString: process.env.DATABASE_URL || '',
    // RDS enforces TLS. rejectUnauthorized:false uses the Amazon RDS CA without
    // shipping the CA bundle; set it true + provide the bundle to fully verify.
    ssl: process.env.DATABASE_SSL === 'true' ? { rejectUnauthorized: false } : undefined,
  },
}),
Your connection string ends up looking like:
postgresql://payload:<password>@<rds-endpoint>:5432/appdb
Store it as DATABASE_URL (and set DATABASE_SSL=true) — we'll add it to Amplify later.
Verify the RDS certificate (recommended)
rejectUnauthorized: false encrypts traffic but doesn't verify the server's certificate — acceptable on a trusted network, but since our endpoint is public it's worth verifying to close the MITM gap. Download your region's Amazon RDS CA bundle and inline it (a file read isn't reliably available in Amplify's SSR runtime):
curl -o rds-eu-west-1-bundle.pem \
  https://truststore.pki.rds.amazonaws.com/eu-west-1/eu-west-1-bundle.pem
Expose it as a module string (e.g. src/lib/rds-ca.ts → export const RDS_CA = \...``) and gate verification on an env var:
import { RDS_CA } from './lib/rds-ca'

ssl:
  process.env.DATABASE_SSL !== 'true'
    ? false
    : process.env.DATABASE_SSL_VERIFY === 'true'
      ? { ca: RDS_CA, rejectUnauthorized: true } // full verification
      : { rejectUnauthorized: false },           // encryption only
Then set DATABASE_SSL_VERIFY=true and make sure DATABASE_URL has no sslmode=no-verify (that would force verification off). Roll it out on staging first — if the CA or hostname doesn't match, the DB connection fails closed.
Security trade-off: the RDS endpoint is public (Amplify can't reach a VPC-private DB), so it leans on strong credentials + enforced TLS. Certificate verification above hardens it further; RDS Proxy or VPC-based compute would harden it more.
Step 2 — S3 bucket + IAM role (no access keys)
This is the biggest departure from most tutorials. They hand Payload an S3_ACCESS_KEY_ID / S3_SECRET_ACCESS_KEY pair. We don't create keys at all.
Create the bucket
# Private bucket in the same region.
aws s3api create-bucket \
  --bucket ds-payload-media-dsm \
  --region eu-west-1 \
  --create-bucket-configuration LocationConstraint=eu-west-1

# Belt-and-suspenders: block all public access.
aws s3api put-public-access-block \
  --bucket ds-payload-media-dsm \
  --public-access-block-configuration \
    BlockPublicAcls=true,IgnorePublicAcls=true,BlockPublicPolicy=true,RestrictPublicBuckets=true
There is no bucket policy and objects stay private. Uploads go in via presigned PUT (client uploads); reads are proxied through the app's /api/media/file/* route using the compute role. Nothing in the bucket is publicly reachable — stricter than the common tutorial setup that unblocks public access and adds a public-read policy.
Use the Amplify compute role instead of keys
Amplify exposes two IAM roles, and it matters which one you use:
- Service role — Amplify assumes this for its own operations (logging, calling services during build/deploy). Not where your S3 permissions go.
- Compute role — the SSR runtime assumes this, so it's what the AWS SDK uses at request time to reach AWS resources. This is the one.
Attach a role with least-privilege S3 access as the Compute role under App settings → IAM roles → Compute role. The running app then resolves S3 credentials from that role via the default AWS provider chain — no keys anywhere.
The least-privilege policy attached to that role — bucket-level actions on the bucket ARN, object actions on its contents:
{
  "Version": "2012-10-17",
  "Statement": [
    {
      "Sid": "ListBucket",
      "Effect": "Allow",
      "Action": ["s3:ListBucket", "s3:GetBucketLocation"],
      "Resource": "arn:aws:s3:::ds-payload-media-dsm"
    },
    {
      "Sid": "ObjectCrud",
      "Effect": "Allow",
      "Action": ["s3:GetObject", "s3:PutObject", "s3:DeleteObject"],
      "Resource": "arn:aws:s3:::ds-payload-media-dsm/*"
    }
  ]
}
Save that as s3-policy.json and attach it to the compute role:
aws iam put-role-policy \
  --role-name <amplify-compute-role-name> \
  --policy-name ds-payload-s3 \
  --policy-document file://s3-policy.json
Then, in the Payload S3 config, omit credentials entirely so the AWS SDK resolves them from the default provider chain (the compute role in Amplify, your env vars locally):
s3Storage({
  collections: { media: true },
  clientUploads: true, // browser -> S3 via presigned URLs (see image uploads section)
  bucket: process.env.S3_BUCKET as string,
  config: {
    region: process.env.S3_REGION || 'eu-west-1',
    // No credentials block. The AWS SDK resolves credentials from the default
    // provider chain — i.e. the Amplify compute IAM role. No keys anywhere.
  },
})
Why this is better: no long-lived secrets to rotate, leak, or commit. The role is scoped to exactly the actions and bucket you need, and credentials are short-lived and managed by AWS.
S3 CORS (required for browser uploads)
Because uploads go directly from the browser to S3 (presigned PUT), the bucket needs a CORS rule allowing your app origin:
aws s3api put-bucket-cors --bucket ds-payload-media-dsm --cors-configuration '{
  "CORSRules": [{
    "AllowedHeaders": ["*"],
    "AllowedMethods": ["GET", "HEAD", "PUT"],
    "AllowedOrigins": ["https://<your-domain>"],
    "ExposeHeaders": ["ETag", "x-amz-request-id"],
    "MaxAgeSeconds": 3000
  }]
}'
Step 3 — Google SSO for the admin panel
Instead of Payload's built-in email/password, admin access is Google sign-in via Auth.js (next-auth), wired into Payload with the payload-authjs plugin.
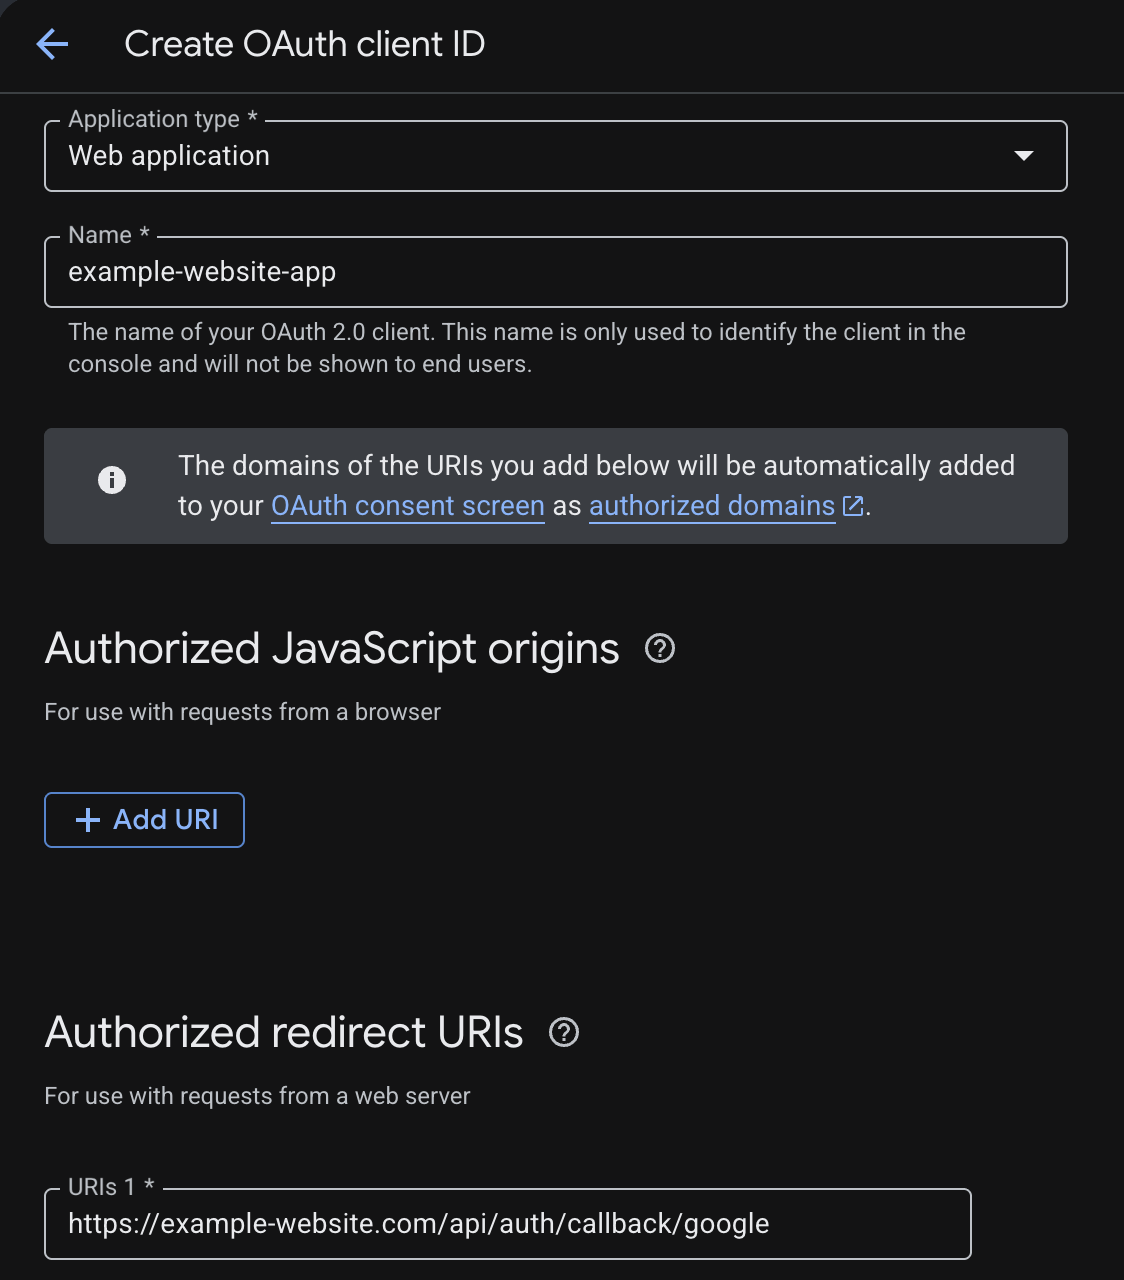
Create the OAuth client
In Google Cloud Console → APIs & Services → Credentials → OAuth client ID (Web), add the authorized redirect URI:
Gate sign-in with an allowlist
The real access control is an email allowlist — only listed addresses can authenticate, so only they can ever become admins. Everyone else is rejected even with a valid Google account:
const allowedEmails = (process.env.AUTH_ALLOWED_EMAILS || '')
  .split(',').map((e) => e.trim().toLowerCase()).filter(Boolean)

export const authConfig = {
  providers: [Google({ clientId: process.env.AUTH_GOOGLE_ID, clientSecret: process.env.AUTH_GOOGLE_SECRET,
    authorization: { params: { prompt: 'select_account' } } })],
  callbacks: {
    signIn: ({ profile }) => {
      if (profile?.email_verified === false) return false
      return allowedEmails.includes((profile?.email || '').toLowerCase())
    },
  },
}
And the plugin ties Auth.js sessions to the Payload database:
plugins: [ authjsPlugin({ authjsConfig: authConfig }), /* ...s3Storage */ ]
Behind CloudFront, pin AUTH_URL to your canonical origin and set AUTH_TRUST_HOST=true so the OAuth redirect_uri always matches what's registered in Google (the auto-detected scheme/host can be wrong behind a proxy).

Step 4 — Deploy on Amplify
The build spec (amplify.yml)
There's one non-obvious gotcha that trips up almost everyone: Amplify exposes environment variables at build time only — they are not present in the SSR runtime. Payload reads DATABASE_URL and PAYLOAD_SECRET at runtime, so if you don't do anything, the app boots with empty values and crashes.
The fix is to write the needed vars into .env.production during the build, which Next.js then loads at runtime:
version: 1
frontend:
  phases:
    preBuild:
      commands:
        - npm ci --cache .npm --prefer-offline
        - rm -rf .next   # force a clean build; stale .next breaks admin hydration
    build:
      commands:
        # Persist runtime env vars so they survive into the SSR runtime.
        - env | grep -E '^(DATABASE_URL|DATABASE_SSL|PAYLOAD_SECRET|NEXT_PUBLIC_SERVER_URL|S3_BUCKET|S3_REGION|AUTH_SECRET|AUTH_GOOGLE_ID|AUTH_GOOGLE_SECRET|AUTH_ALLOWED_EMAILS|AUTH_TRUST_HOST|AUTH_URL)=' >> .env.production || true
        - npm run build
    postBuild:
      commands:
        # Trim the artifact to stay under Amplify's max output size.
        - rm -rf .next/cache            # build cache, not needed at runtime
        - find .next -name '*.map' -type f -delete   # server source maps (~tens of MB)
  artifacts:
    baseDirectory: .next
    files: ['**/*']
  cache:
    paths:
      - .npm/**/*        # NOT .next/cache — caching it caused hydration mismatches
Two hard-won details in that postBuild:
- Artifact size limit. Amplify caps the deploy output size. A Next.js SSR build can blow past it once you include the build cache and server source maps. Deleting
.next/cacheand*.mapbrought the artifact comfortably under the limit. - Don't cache
.next/cache. Caching it between builds produced client/server chunk mismatches that broke admin hydration. Caching only.npmis safe.
Connect the repo and set env vars
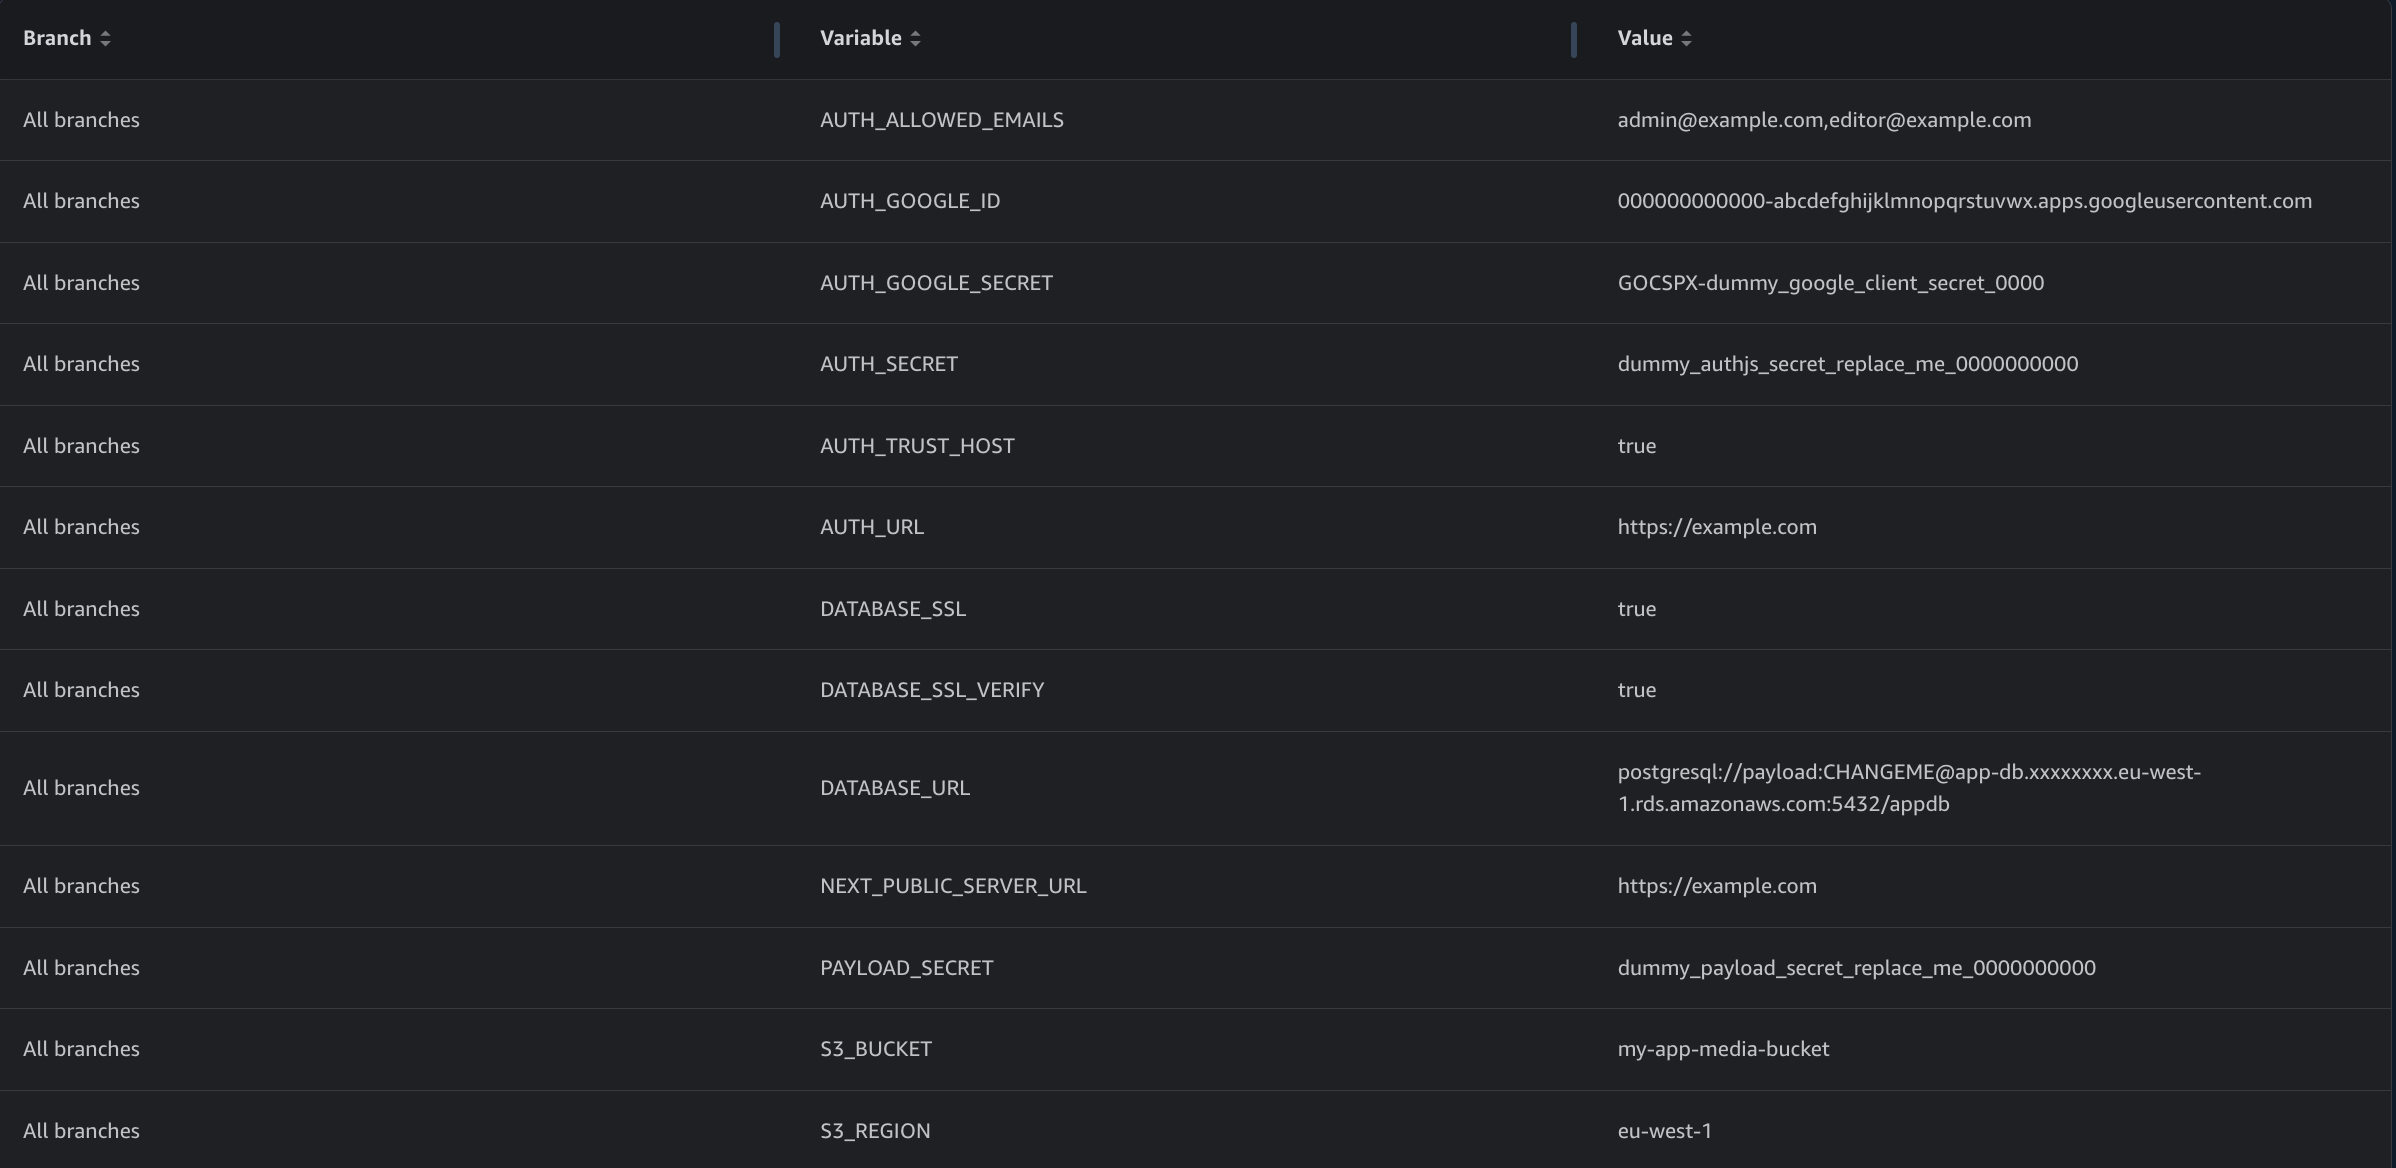
In the Amplify console: create app → connect GitHub → pick the branch. Then under Environment variables, add everything the build filters into .env.production (DATABASE_URL, DATABASE_SSL, PAYLOAD_SECRET, NEXT_PUBLIC_SERVER_URL, S3_BUCKET, S3_REGION, and the AUTH_* values). Note there are no S3 credentials here — that's the compute role from Step 2.
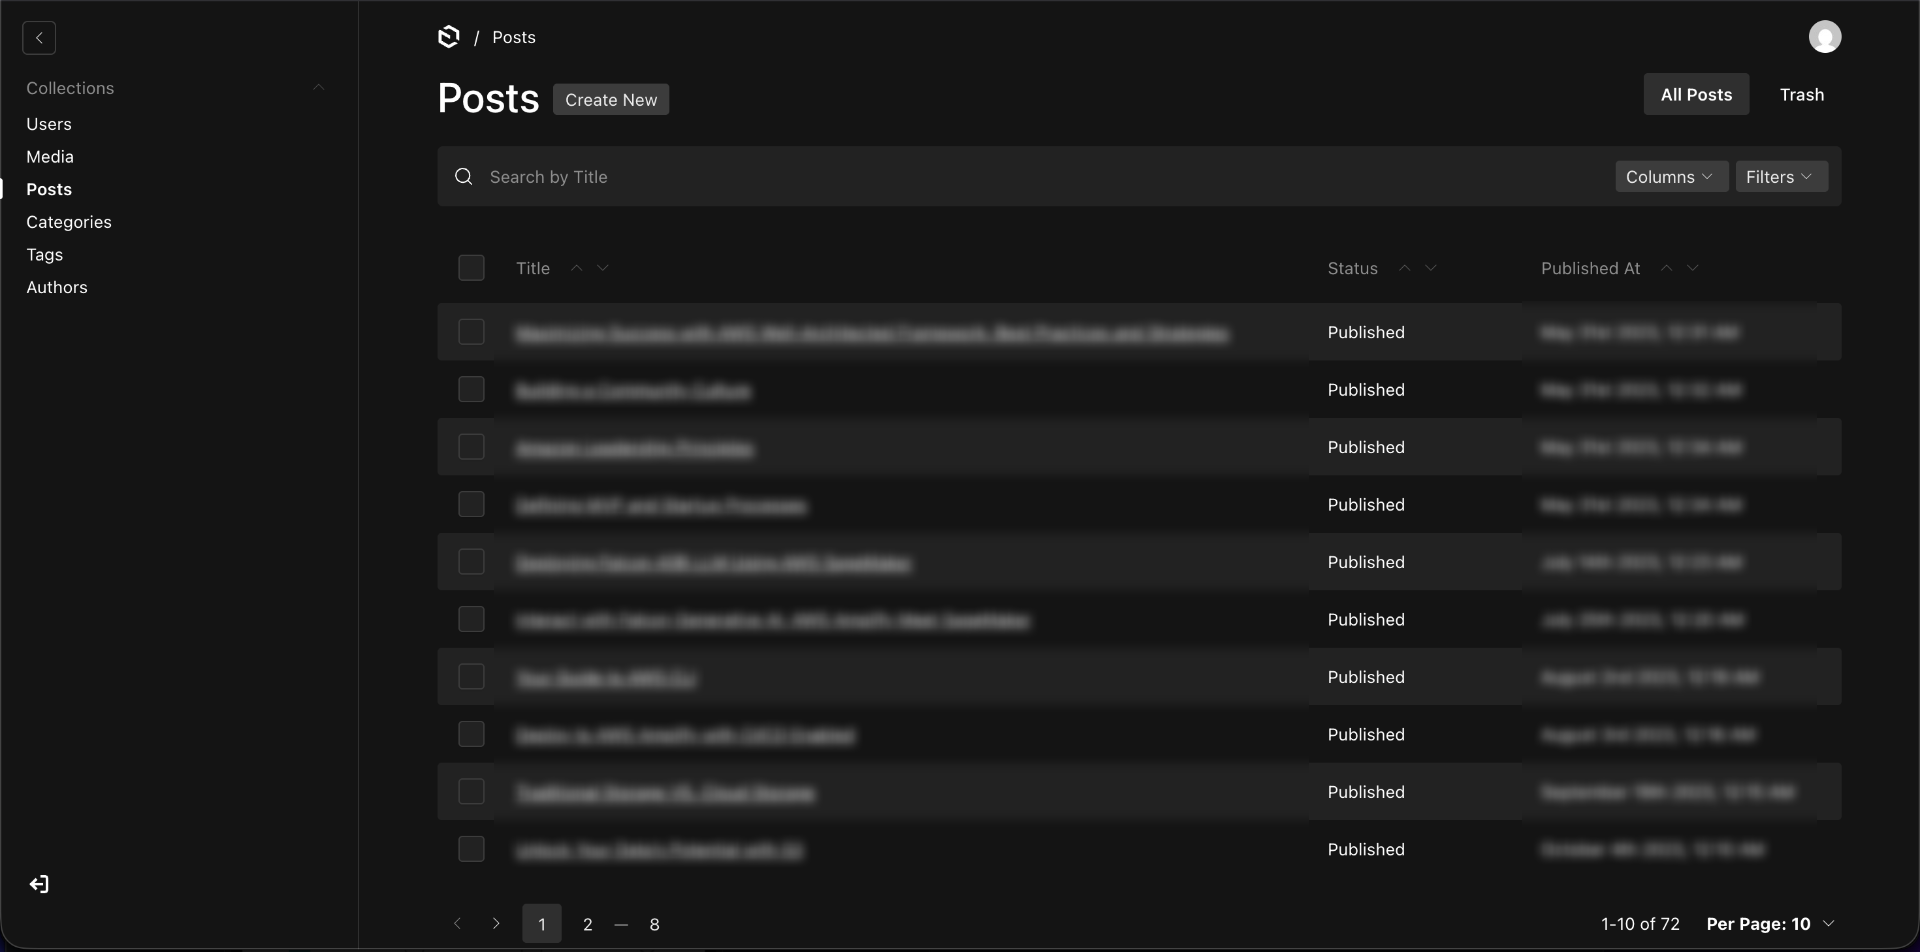
Deploy, then visit /admin and sign in with an allowlisted Google account.
Step 5 — Image uploads: send them straight to S3
This one cost me real time, so I'm calling it out.
Symptom: uploading an image in the Payload admin failed with a cryptic Unexpected token '<' ... is not valid JSON. That "token <" is the first character of an HTML error page returned where the admin expected JSON.
Root cause: the upload was being streamed through the Next.js SSR handler, and Amplify's serverless compute rejects larger request bodies — returning an HTML error the admin couldn't parse.
The fix: don't send file bytes through the app at all. Switch Payload S3 storage to client uploads (clientUploads: true). The browser requests a presigned URL and PUTs the file directly to S3, bypassing the SSR request-body path entirely:
s3Storage({
  collections: { media: true },
  clientUploads: true, // browser -> S3 via presigned URLs
  bucket: process.env.S3_BUCKET as string,
  config: { region: process.env.S3_REGION || 'eu-west-1' },
})
This is exactly why the S3 CORS rule from Step 2 is required (the browser needs to PUT to the bucket). It's also the right pattern in general: keep large binaries off your compute path and let object storage handle them.
Caching & content freshness — the honest version
Here's where I'll save you a debugging session.
The pages fetch from Payload and render with time-based ISR:
// on each public route
export const revalidate = 60
and the data layer caches reads for the same 60s window. After an editor changes a post, it appears within ~60s of continued traffic. Content is eventually consistent, not instant.
Why on-demand revalidateTag isn't used on Amplify
Every Payload/Next tutorial tells you to add an afterChange hook that calls revalidateTag(...) for instant updates. On Amplify that pattern doesn't behave as expected — and it's a known limitation documented by AWS: Amplify Hosting does not support On-Demand ISR.
The reason is architectural. Amplify SSR runs on many isolated Lambda instances, each with its own in-memory cache, so a revalidateTag call only clears the one instance that executed it — the rest keep serving cached content until their own time window lapses.
To see this concretely, I ran a small probe (a cached endpoint returning a frozen cacheId plus a per-instance id):
- 60 concurrent requests fanned out to ~31 distinct Lambda instances.
- After firing
revalidateTag, exactly 1 instance refreshed; ~23 kept serving stale — matching the documented limitation.
Because of this, on-demand invalidation gives a false sense of instant updates while doing almost nothing across the fleet. The reliable approach on Amplify is the 60s time-based window, which each instance honors independently. Two rules that fall out of this:
- Don't use
cacheLife('max')or long ISR windows on Amplify — with no working on-demand purge, most instances would serve stale content until a redeploy. - If you truly need instant, cluster-wide invalidation, you need a platform with a shared cache: Vercel (native) or self-hosted OpenNext on AWS (Lambda + CloudFront + S3 + DynamoDB for the tag index — no Redis). Until then, time-based ISR is the correct choice on Amplify.
CI/CD — linting, tests, SAST, SCA, and pre-commit
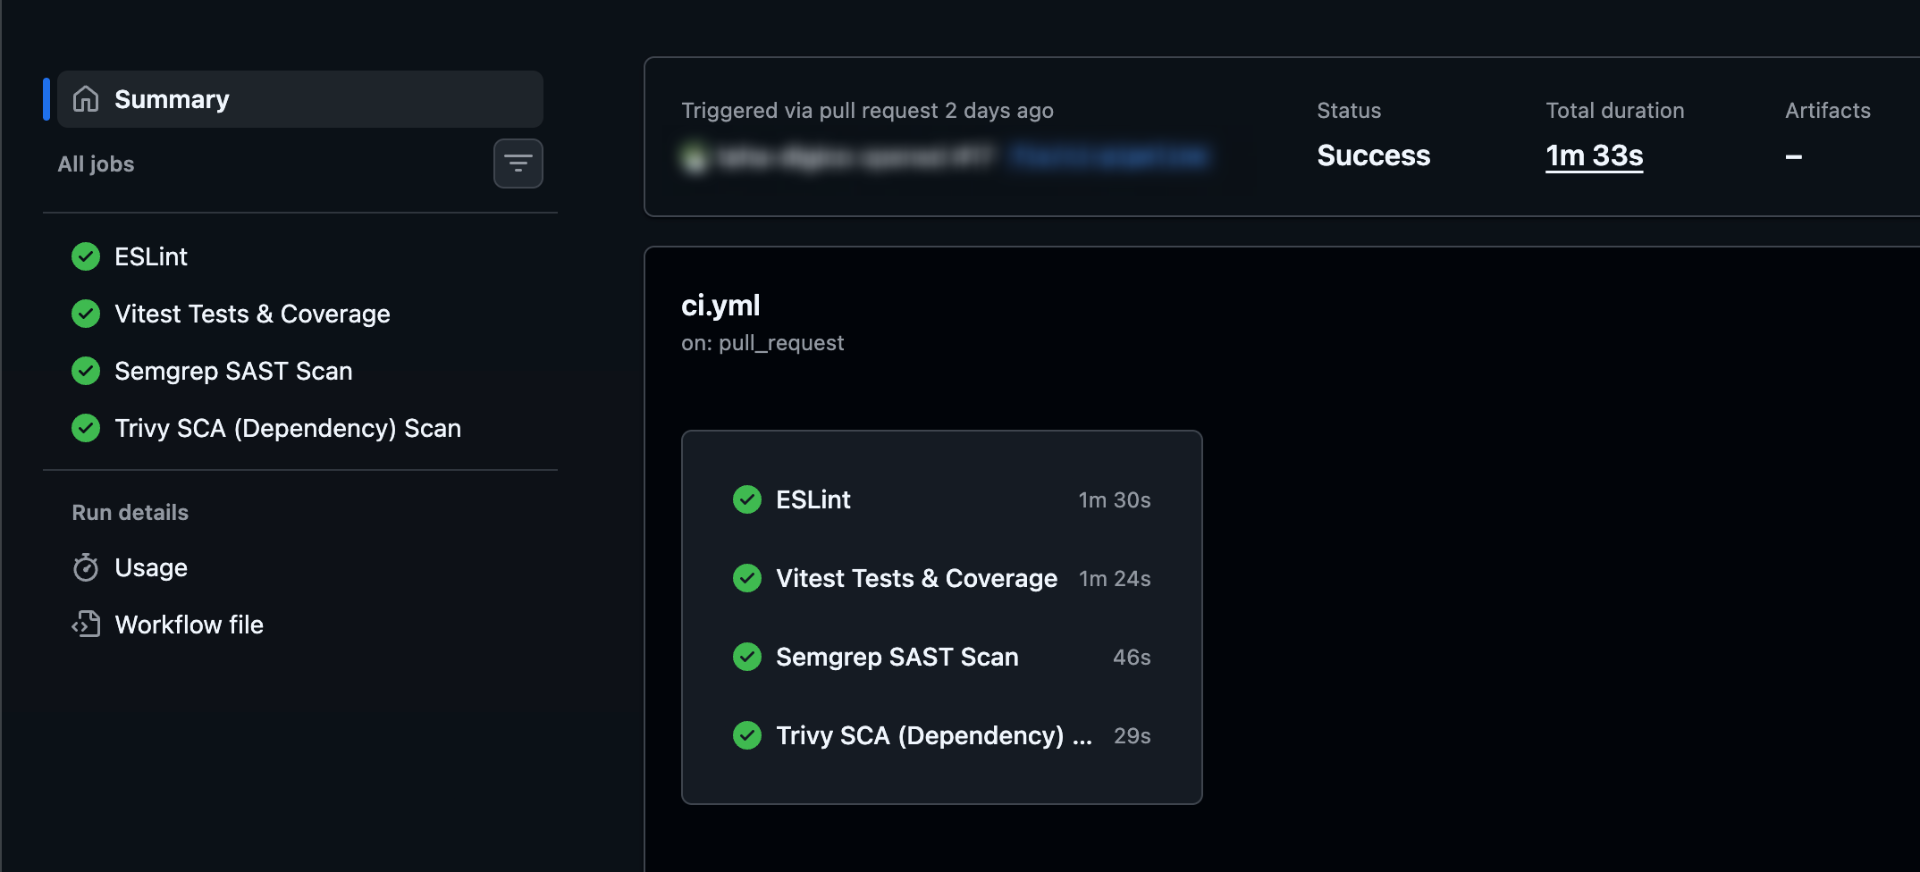
Two GitHub Actions workflows run on every pull request, plus a local/CI pre-commit stage.
Workflow 1 — quality + security (ci.yml)
Four parallel jobs:
- ESLint —
npm run lint - Vitest + coverage —
npx vitest run --coverage - Semgrep (SAST) — static analysis for code vulnerabilities
- Trivy (SCA) — dependency vulnerability scan, failing on CRITICAL/HIGH
name: CI Pipeline
on:
  pull_request:
    branches: [main]

jobs:
  lint:
    runs-on: ubuntu-latest
    steps:
      - uses: actions/checkout@<pinned-sha>
      - uses: actions/setup-node@<pinned-sha>
        with: { node-version: '20', cache: 'npm' }
      - run: npm ci
      - run: npm run lint

  test:
    runs-on: ubuntu-latest
    steps:
      - uses: actions/checkout@<pinned-sha>
      - uses: actions/setup-node@<pinned-sha>
        with: { node-version: '20', cache: 'npm' }
      - run: npm ci
      - run: npx vitest run --coverage

  security-sast:
    runs-on: ubuntu-latest
    container: { image: semgrep/semgrep }
    steps:
      - uses: actions/checkout@<pinned-sha>
      - run: semgrep scan --config auto --exclude '.next' --exclude 'coverage' --exclude 'node_modules' --error

  security-sca:
    runs-on: ubuntu-latest
    steps:
      - uses: actions/checkout@<pinned-sha>
      - uses: aquasecurity/trivy-action@<pinned-sha>
        with:
          scan-type: 'fs'
          scan-ref: '.'
          scanners: 'vuln'
          severity: 'CRITICAL,HIGH'
          exit-code: '1'
          format: 'table'
Tip: pin third-party Actions to a commit SHA, not a tag. A tag can be moved; a SHA can't. It's a small supply-chain hardening step CI security scanners will thank you for.
Workflow 2 — pre-commit hooks (pre-commit.yml)
Runs the same hooks CI-side (via prek, a fast pre-commit runner) so a PR can't merge around them:
- id: trailing-whitespace
- id: end-of-file-fixer
- id: check-yaml
- id: check-json
- id: check-added-large-files   # args: ["--maxkb=10240"]  (allow up to 10MB media)
- id: check-merge-conflict
- id: detect-private-key
- id: eslint                     # local hook: npm run lint
The detect-private-key hook is a nice backstop given how much AWS wiring is involved — it fails the build if anyone ever tries to commit a key. (Which, since we use IAM roles, we shouldn't even have.)
Slack alerts — builds and runtime health
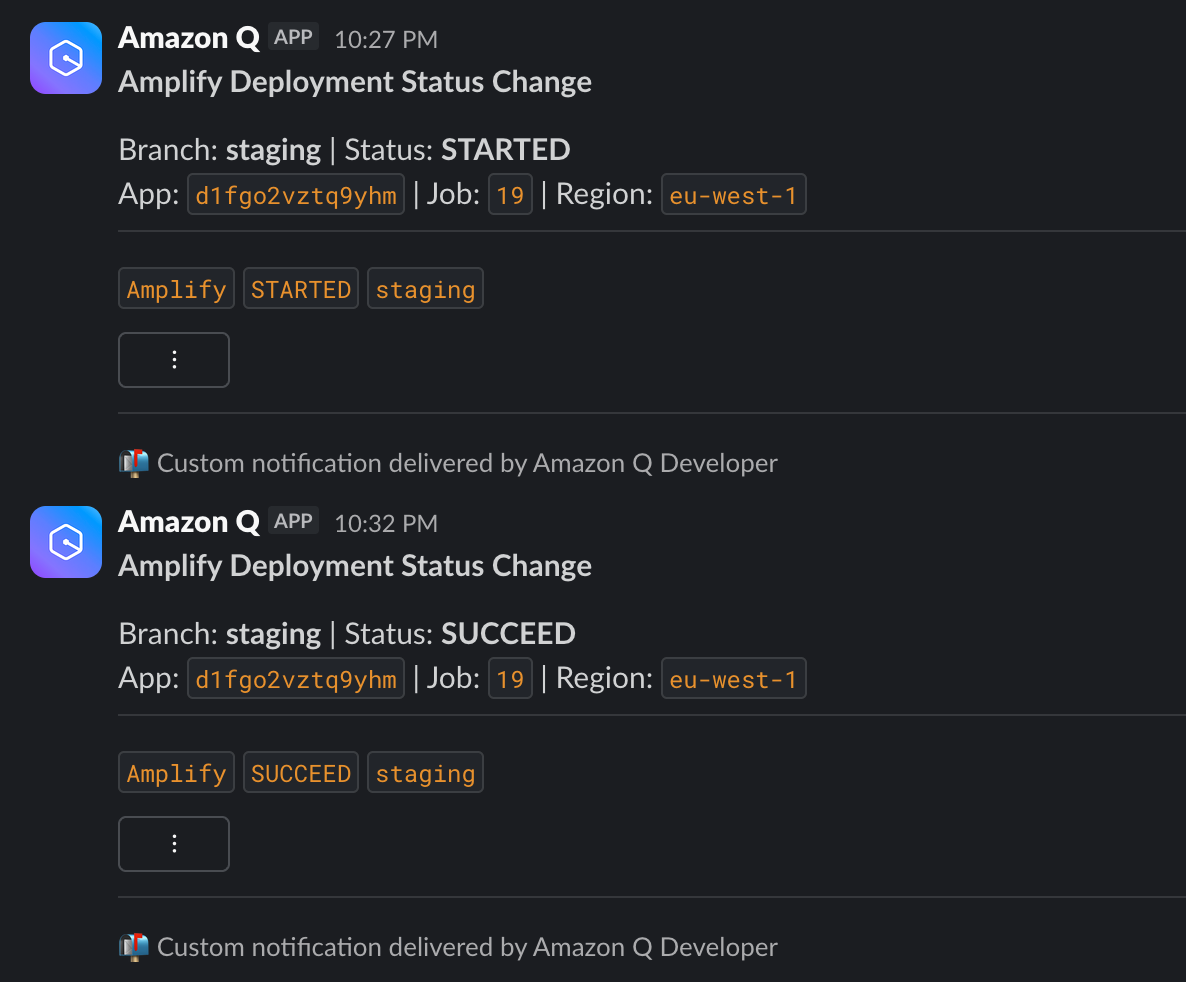
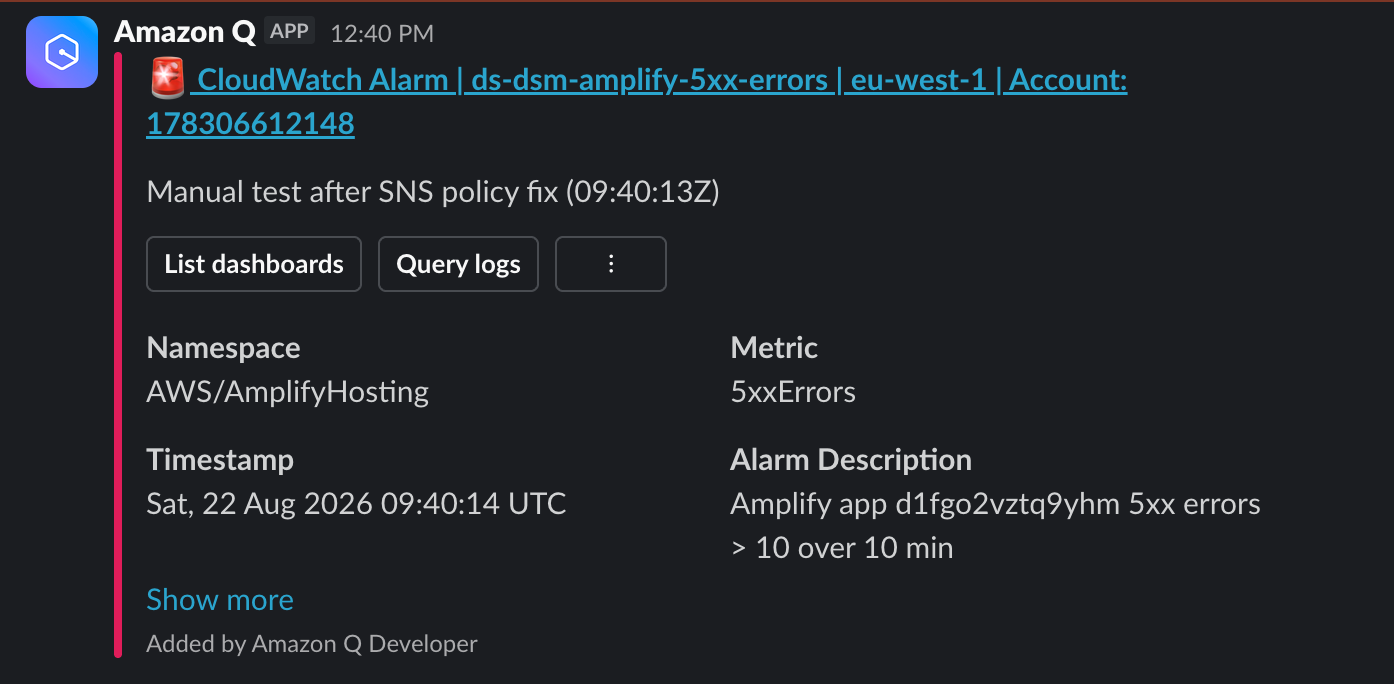
Two notification paths land in Slack via AWS Chatbot (now Amazon Q Developer in chat applications) — no custom webhook code:
- Builds — Amplify deployment events via an EventBridge rule.
- Runtime health — CloudWatch alarms on Amplify's HTTP metrics plus a scheduled health check.
Both fan out through one SNS topic.
The SNS topic (and the policy gotcha)
aws sns create-topic --name app-alerts --region eu-west-1

# Allow BOTH EventBridge and CloudWatch to publish. Omitting the CloudWatch
# principal is a classic silent failure: alarms log "Failed to execute action"
# and nothing reaches Slack, while build events (via EventBridge) still work.
aws sns set-topic-attributes --region eu-west-1 \
  --topic-arn arn:aws:sns:eu-west-1:<ACCOUNT_ID>:app-alerts \
  --attribute-name Policy --attribute-value '{
    "Version":"2012-10-17",
    "Statement":[
      {"Sid":"Events","Effect":"Allow","Principal":{"Service":"events.amazonaws.com"},
       "Action":"SNS:Publish","Resource":"arn:aws:sns:eu-west-1:<ACCOUNT_ID>:app-alerts"},
      {"Sid":"CloudWatch","Effect":"Allow","Principal":{"Service":"cloudwatch.amazonaws.com"},
       "Action":"SNS:Publish","Resource":"arn:aws:sns:eu-west-1:<ACCOUNT_ID>:app-alerts",
       "Condition":{"StringEquals":{"AWS:SourceAccount":"<ACCOUNT_ID>"}}}
    ]
  }'
This bit me in practice: the topic only allowedevents.amazonaws.com, so build messages worked but every CloudWatch alarm silently failed to publish — including a site-down alarm during a real incident. Grantcloudwatch.amazonaws.comtoo.
Build notifications (EventBridge rule + input transformer)
# Match Amplify deployment status changes for this app.
aws events put-rule --region eu-west-1 --name amplify-build-status \
  --event-pattern '{
    "source":["aws.amplify"],
    "detail-type":["Amplify Deployment Status Change"],
    "detail":{"appId":["<APP_ID>"],"jobStatus":["STARTED","SUCCEED","FAILED"]}
  }'

# Target SNS, formatting the raw event with an input transformer.
aws events put-targets --region eu-west-1 --rule amplify-build-status --targets '[
  {
    "Id":"sns",
    "Arn":"arn:aws:sns:eu-west-1:<ACCOUNT_ID>:app-alerts",
    "InputTransformer":{
      "InputPathsMap":{"branch":"$.detail.branchName","status":"$.detail.jobStatus","app":"$.detail.appId","job":"$.detail.jobId"},
      "InputTemplate":"\"Amplify build <status> — branch <branch> (app <app>, job <job>)\""
    }
  }
]'
Runtime health alerts (CloudWatch alarms)
Rather than parsing logs, alert on Amplify's own HTTP metrics (AWS/AmplifyHosting) — they're free and reliable:
# Spike in 5xx responses.
aws cloudwatch put-metric-alarm --region eu-west-1 \
  --alarm-name amplify-5xx-errors \
  --namespace AWS/AmplifyHosting --metric-name 5xxErrors \
  --dimensions Name=App,Value=<APP_ID> \
  --statistic Sum --period 300 --evaluation-periods 2 --threshold 10 \
  --comparison-operator GreaterThanThreshold \
  --alarm-actions arn:aws:sns:eu-west-1:<ACCOUNT_ID>:app-alerts

# Spike in 4xx (looser threshold). Add a Latency alarm the same way.
aws cloudwatch put-metric-alarm --region eu-west-1 \
  --alarm-name amplify-4xx-errors \
  --namespace AWS/AmplifyHosting --metric-name 4xxErrors \
  --dimensions Name=App,Value=<APP_ID> \
  --statistic Sum --period 300 --evaluation-periods 3 --threshold 100 \
  --comparison-operator GreaterThanThreshold \
  --alarm-actions arn:aws:sns:eu-west-1:<ACCOUNT_ID>:app-alerts
For true availability, add a synthetic health check: a small Lambda on a rate(5 minutes) EventBridge schedule that requests /api/health and publishes a custom SiteHealthy metric (1/0) via aws cloudwatch put-metric-data. Alarm on it:
aws cloudwatch put-metric-alarm --region eu-west-1 \
  --alarm-name payload-site-down \
  --namespace Custom/Payload --metric-name SiteHealthy \
  --dimensions Name=Url,Value=https://<your-domain>/api/health \
  --statistic Minimum --period 300 --evaluation-periods 2 --threshold 1 \
  --comparison-operator LessThanThreshold --treat-missing-data breaching \
  --alarm-actions arn:aws:sns:eu-west-1:<ACCOUNT_ID>:app-alerts
Wire Slack (AWS Chatbot)
Authorizing the Slack workspace is a one-time console step (OAuth — no CLI). After that, the channel config is CLI:
aws chatbot create-slack-channel-configuration --region us-east-1 \
  --configuration-name app-alerts \
  --slack-team-id <WORKSPACE_ID> --slack-channel-id <CHANNEL_ID> \
  --iam-role-arn arn:aws:iam::<ACCOUNT_ID>:role/chatbot-role \
  --sns-topic-arns arn:aws:sns:eu-west-1:<ACCOUNT_ID>:app-alerts
Flow, end to end:
Amplify deploy events ─> EventBridge rule (input transformer) ─┐
CloudWatch alarms (5xx / 4xx / latency) ───────────────────────┼─> SNS ─> Chatbot ─> Slack
Scheduled health check ─> SiteHealthy metric ─> site-down alarm ┘
Cost estimation
Rough monthly cost for a low-to-moderate traffic marketing site in eu-west-1. Numbers are indicative — check current pricing for your region and usage.
| Service | Config | Est. monthly |
|---|---|---|
| Amplify Hosting (compute) | Within/near free tier (500k SSR requests, 100 GB-hrs, 5 GB CDN storage included) | $0 – $10 |
| Amazon RDS PostgreSQL | db.t4g.micro, 20 GB gp3 (Free Tier first 12 mo) | $0 (yr 1) → ~$13 – $18 |
| Amazon S3 | Small media library + requests | ~$1 – $3 |
| AWS WAF | 1 Web ACL + managed rule group + request volume | ~$6 – $12 |
| Route 53 | 1 hosted zone (+ queries) | ~$0.50 – $1 |
| Data transfer out | Modest | ~$1 – $5 |
| SNS + AWS Chatbot | Alerts | ~$0 (free tier) |
| Total | ~$10 – $20/mo (yr 1), ~$25 – $40/mo after |
Cost drivers to watch:
- RDS is the biggest steady cost once Free Tier ends. A single small instance is fine for a CMS; scale up only if the DB is the bottleneck.
- WAF adds a fixed ~$5–6/mo for the Web ACL plus per-rule and per-request charges — worth it for a public admin panel, but it's a line item tutorials often ignore.
- Amplify SSR duration grows with poor caching. The 60s ISR keeps most requests off the compute path; render everything dynamically and this bill climbs.
Security notes
- No static credentials. S3 access is an IAM role on the compute; DB and Payload secrets live in Amplify env / Secrets Manager.
detect-private-keyin pre-commit is the backstop. - Admin access is an allowlist, not just "anyone with Google." Empty list = nobody in (fail closed).
- WAF stays on with AWS managed rule groups in Block — no rules were relaxed. Because uploads go directly to S3, nothing about media forced a WAF exception.
- RDS TLS enforced. For maximum assurance, verify the RDS CA (flip
rejectUnauthorizedon and ship the bundle) and move RDS into private subnets.
Troubleshooting cheat sheet
| Symptom | Cause | Fix |
|---|---|---|
Unexpected token '<' ... not valid JSON on image upload | Upload streamed through SSR; compute rejects the large body with an HTML error | Use clientUploads: true so the browser PUTs directly to S3 |
App boots with empty DATABASE_URL / crashes | Amplify env vars are build-time only | Write them to .env.production in the build step |
| DB connection timeout / SSL error | RDS enforces TLS | Set DATABASE_SSL=true; use sslmode in the URL |
| Admin hydration is broken after deploy | Stale .next / cached .next/cache | rm -rf .next in preBuild; don't cache .next/cache |
| Google login redirect mismatch | Wrong redirect_uri behind CloudFront | Pin AUTH_URL; set AUTH_TRUST_HOST=true |
| Deploy fails on artifact size | .next/cache + source maps too big | Delete .next/cache and *.map in postBuild |
| Edited post not showing instantly | On-demand ISR unsupported on Amplify | Expected — content refreshes on the 60s ISR window |
Conclusion
Amplify is a genuinely good home for a Payload + Next.js site if you understand its edges: use IAM roles instead of keys, expect build-time-only env vars, push uploads straight to S3, and — most importantly — accept that content freshness is time-based ISR, not instant on-demand invalidation. Within those constraints it's cheap, low-ops, and scales to zero when nobody's looking.
If instant, cluster-wide cache invalidation becomes a hard requirement, that's the signal to move to Vercel or self-host with OpenNext — not a reason to fight Amplify.